
For father's day this year I got to make another breakfast for my parents. I prepared pancakes with a blueberry syrup, store-bought breakfast sausages, and then made another yeast bread that I've been wanting to try out for a while.
For the bread recipe, I included the optional nutmeg, vanilla and cocoa. It turned out very delicious, and was really fun for me to make, but I probably could have done better (I didn't roll it up as tightly as I could have). I didn't really taste much of the chocolatey-cocoa flavor that others who have tried this recipe and included the cocoa have enjoyed. I tried the bread nearly at room temperature but still a little bit warm, and it was delicious!
Raisin Swirl Bread
Recipe from Dorie Greenspan's
Baking: From My Home to Yours For the bread
1 packet active dry yeast
1/4 cup sugar, plus a pinch
1 1/4 cups just-warm-to-the-touch whole milk
1/2 stick (4 tablespoons or 60g) unsalted butter, at room temperature
3/4 teaspoon salt
1 large egg
1/4 teaspoon pure vanilla extract (optional)
Grated zest of 1/2 orange (optional)
Pinch of freshly grated nutmeg (optional)
3 3/4 to 4 cups all-purpose (plain) flour
For the swirl
1 tablespoon sugar
2 teaspoons ground cinnamon
2 teaspoons unsweetened cocoa powder (optional)
1 cup moist, plump raisins (dark or golden)
3 tablespoons (45 grams) unsalted butter, softened to a spreadable consistency
To make the bread
Put the yeast in a small bowl, toss in the pinch of sugar and stir in 1/4 cup of the warm milk. Let rest for 3 minutes, then stir - the yeast may not have dissolved completely and it may not have bubbled, but it should be soft.

Working with a stand mixer, preferably fitted with a paddle attachment, combine the remaining 1 cup of milk, the butter and the remaining 1/4 cup sugar and mix for a minute or two. Add the salt, egg and vanilla, if you are using it, as well as the zest and nutmeg, if you're using them, and mix for a minute. In all likelihood, the mixture will look unpleasantly curdly (it will look even worse when you add the yeast). Add the yeast mixture and beat on low-medium speed for 1 minute more.
Turn the mixer off and add 2 3/4 cups of the flour. Mix on low speed just until you work the flour into the liquids - you'll have a sticky mix. If you've got a dough hook, switch to it now. Add another 1 cup of flour, increase the mixer speed to medium and beat the dough for a couple of minutes. If the dough does not come together and almost clean the sides of the bowl, add up to 1/4 cup more flour, 1 tablespoon at a time. Keep the mixer speed at medium and knead the dough for about 3 minutes, or until it is smooth and has a lovely buttery sheen. The dough will be very soft, much too soft to knead by hand.

Butter a large bowl, turn the dough into a bowl and cover the bowl tightly with plastic wrap. Put the bowl in a warm place and let the dough rise until it is doubled in size, about 1 1/2 hours.

Scrape the dough onto a large piece of plastic wrap, wrap it and put it in the freezer for 30 minutes to firm enough to be rolled easily. (At this point, you can instead refrigerate the dough overnight if that is more convenient).
 To make the swirl and shape the loaf
Butter a 9 x 5 inch loaf pan.
Whisk together the sugar, cinnamon and cocoa, if you're using it. Check that the raisins are nice and moist; if they're not, steam them for a minute, then dry them well.
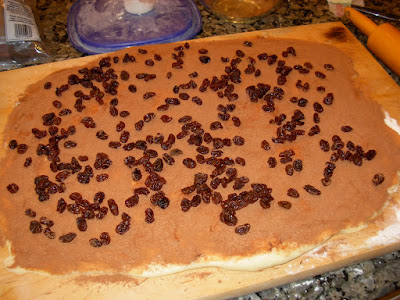
Put the dough on a large work surface lightly dusted with flour, lightly dust the top of the dough and roll the dough into a rectangle about 12 x 18 inches.

Gently smear 2 tablespoons of the butter over the surface of the dough - this is most easily done with your fingers. Sprinkle over the sugar mixture and scatter over the raisins. Starting from a short side of the dough, roll the dough up jelly-roll fashion, making sure to roll the dough snugly. Fit the dough into the buttered pan, seam side down, and tuck the ends under the loaf.

Cover the pan loosely with wax paper and set in a warm place; let the dough rise until it comes just a little above the edges of the pan, about 45 minutes.
Getting ready to bake
When the dough has almost fully risen, centre a rack in the oven and preheat the oven to 375 degrees F (190 degrees Celsius). Line a baking sheet with parchment or a silicone mat.
Melt the remaining tablespoon of butter, and brush the top of the loaf with the butter. Put the pan on the baking sheet and bake the bread for about 20 minutes. Cover loosely with a foil tent and bake for another 25 minutes or so, until the bread is golden and sounds hollow when the bottom of the pan is tapped. Transfer the pan to a rack and cool for 5 minutes, then unmold. Invert the bread and cool to room temperature right side up on the rack.


 So I'm actually in New York right now. Or, technically, as I'm writing this I'm back home, but yay for being able to write posts early and schedule it to post on the right date...haha. Anyway, my mom asked me to make something for her to bring into work for a work party, and I couldn't choose one thing so I chose two. This is the first of them (both of them are bars). It was really convenient to make blueberry crumb bars, because after Father's Day I had a big costco-sized container almost full of the remaining blueberries that JUST made 4 cups, and nobody in my family would finish that much before having to leave so I just used them for this recipe.

 In another bowl, stir together 1/2 sugar and cornstarch. Gently mix in the blueberries. Sprinkle the blueberry mixture evenly over the crust. Crumble remaining dough over the berry layer.

 Bake in preheated oven for 45 minutes, or until top is slightly brown. Cool completely before cutting into squares.


 I've never made pancakes before and was really scared to try it, but it turned out to be extremely easy. For Father's Day alongside the Raising Swirl Bread, I also made these pancakes that I found from
  Heat a large skillet over medium-low heat. Coat with nonstick spray and add batter in large spoonfuls (about ¼ cup). Flip the pancakes when the tops begin to bubble, 3 to 5 minutes, and cook the second side until browned.


 I've known my best friend, Kristin, since kindergarten. We have so much in common, one of them I'd say developed separately at the same time. While both of us were at our separate colleges we met up once during break and realized that both of us loved to collect recipes and so on, and that both of us followed baking blogs. So we've baked together a few times since.


 They look normal, right?
 But look how much it sticks! And look at the holes in that cake!! The flavor was okay but it stuck completely to the wrapper and tasted like sponge cake. I guess I have a long way before I can start making recipes from scratch...but it might have been just because I overbaked it. I baked these cupcakes for 20 minutes, but I next time I'll try around 17 (with other changes to the recipe, and changes to the preparation like putting the jam closer to the top...and the sprinkles were okay as a failure-cupcake, but if I am gonna work on this longer, I don't want them!).

 For the frosting, I didn't have as many mini chocolate chips as the recipe called for, and had to chop up a few larger ones.
 Chocolate Chip Cookie Dough Frosting
 I didn't try them, but my brother said they were pretty good:
 Still, nothing compared to Pinkabella's cupcakes:
 I would definitely make sure I have lots of mini chocolate-chips on hand next time, or well, put about half a cup instead of a whole cup in there.


